
|
of packard shutters and barrel lenses This is a pretty arcane post. I can think of only two people that might find this of use. Blaine, who has probably already figured these out, and Ken, who has some Russian barrel lenses and needs one of these if he doesn't already have one. But although of limited use you might find this of interest. It's old technology that is still very useful, particularly if you want to use cheap, but very good, shutterless lenses on a view camera. Most view camera lenses come mounted in shutters.
 The shutter performs two functions: it opens and closes a series of leaves at the speed indicated and opens the iris to the set f stop. But shutters are not cheap. There are inexpensive lenses that can be had that don't have shutters. They are often found in copy cameras and are called barrel lenses.
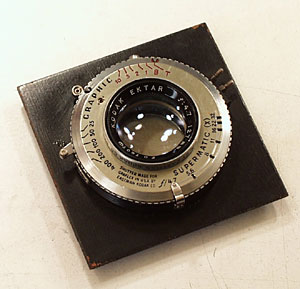
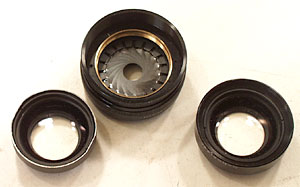
 This is the sharpest lens I own, a Schneider G-Claron. It use to live in a copy camera and is mounted in a barrel lens. View camera lens are made of two elements, front and back (duh!), that can be unscrewd.
 The barrel contains the iris and separates the lens elements at the proper distance. But what about a shutter? A hat works, or a lens cap. If you are using exposures longer that a second you can simply uncover and cover the lens with the lens cap. But there is a more elegant solution — the Packard shutter.
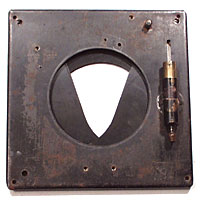
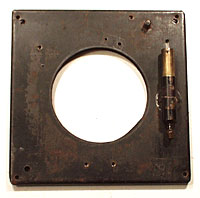
 These can be mounted behind the lens or in front of the lens. I've had this one for 30 years. Never thought that it would be actually usefull. They still build them. This is a 5x5 with a 2 3/4 inch opening. It's a little over 1/4 inch think not including the air cylinder. A new one will run close to $150 with bulb and hose. There is a little cylinder on the right side of the shutter. You attach a hose with a squeeze bulb on it and squeeze. The air pushes the cylinder up and, since it is attached to the leaves inside, the leaves open.
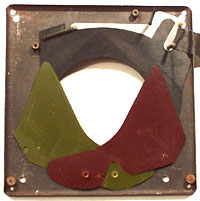
 Once it's open you count off the seconds, still squeezing the bulb, and then release the bulb and the leaves close. Cool! But wait! There's more! There are two kinds of Packard shutters — a #5 and a #6. The #5 does what I just described. A #6 can also do instantaneous exposures of around 1/25 of a second. You squeeze the bulb and it opens and then immediately closes. While reading about front mounting Packard shutters, it mentioned that #6 shutters often had solenoids for flashes. Mine had one. And that a pin was inserted in the back so that the instantaneous exposure would happen. I turned mine around and there was a hole for a pin and that explained what the little cylinder on the front was and what the extra leaf in the shutter did. Here is how that works. This is my #6 Packard shutter with the cover off. I've colorized two of the leaves to make it clearer.
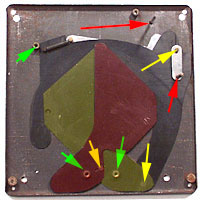  On the left image, the upper red arrow shows the inserted pin. The lower red arrow is where the air piston pushes up. This works because all the pieces are pinned together. The upper yellow arrow attaches the piece being moved by the piston to the aluminum piece underneath and the black piece in between. The black piece is attached to the yellow piece at the lower right yellow arrow and the yellow piece is attached to the red piece at the lower left yellow arrow. As the pieces move they pivot around pivot points which are identified by the lower green arrows. The upper green arrow as a post that acts as a constraint to the black piece to keep it from moving to the left. The second picture shows where the aluminum piece is hitting the pin as the air piston moves it up. If the pin wasn't there it would just continue straight up to open the leaves. This is where it gets interesting.
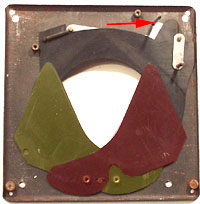
  As the piston continues to move up the aluminum piece is slid right as it moves up the pin. This slides the pin that has been moving the black piece up out of the black piece. The pin inserted from the back is now in the notch of the aluminum piece and the leaves are open. As the piston continues up the aluminum piece starts to rotate around the pin and the left end of the aluminum piece is now pushing the black piece down which causes the other two pieces to close.
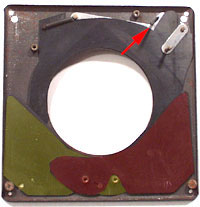
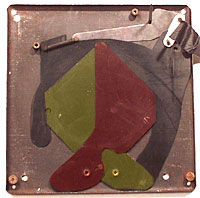 The air piston has moved to its highest position and the leaves are closed. Releasing the bulb causes the piston to go down and the aluminum pieces moves down and the spring pulls it back into the indent on the black piece ready to be opened again.
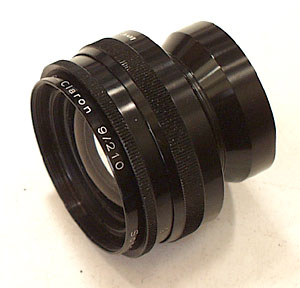
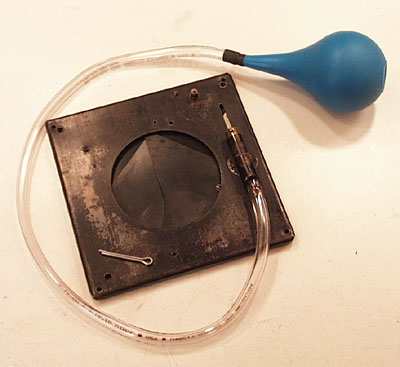 Here it is ready for action. At Blaine's suggestion, I went to our local Ace Hardware for the tubing and our local drugstore for the baby ear cleaning bulb. The cotter pin is what I use for the pin. There is a hole to the left of the cotter pin. If you have along exposure you can insert the pin in that hole and it will lock the leaves open. Now to make the adapter to mount it to the lenses. Actually two adapters. One for the G-Claron and one for the Carl Zeiss Jena Tessar 210/3.5. |